SKAction and SKConstraint
How to implement a space shooter with SpriteKit and SWIFT - Part 1
Use SKAction and SKConstraint:
Tutorial Overview: How to implement a space shooter with SpriteKit and SWIFT
- Part 1: Initial project setup, sprite creation and movement using SKAction and SKConstraint
- Part 2: Adding enemies, bullets and shooting with SKAction and SKConstraint
- Part 3: Adding a HUD with SKLabelNode and SKSpriteNode
- Part 4: Adding basic game logic and collision detection
- Part 5: Adding particles and sound
- Part 6: GameCenter integration
- Part 7: iAd integration
- Part 8: In-App Purchases
Initial project setup, sprite creation and movement using SKAction and SKConstraint

Lite Version
Full Version
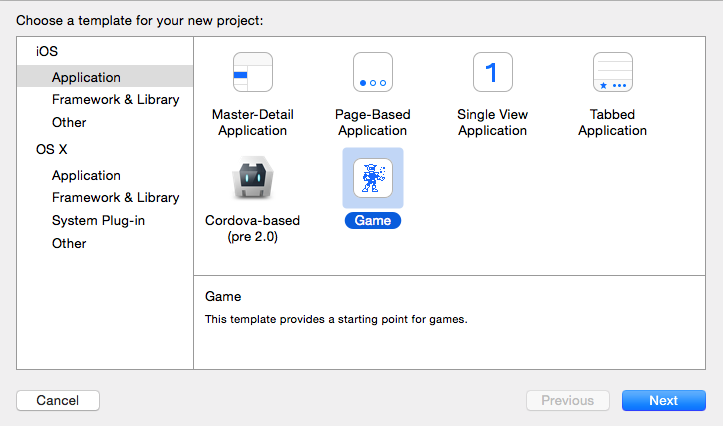
1. Create a new universal project (template: game; language: Swift)

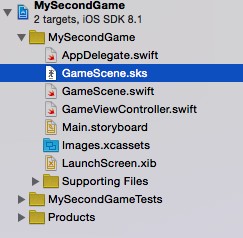
2. Remove the GameScene.sks file
I’ll not use the internal level editor, so this file is obsolete and can be deleted:
Inside GameController.swift remove this code block:
extension SKNode {

  class func unarchiveFromFile(file : NSString) -> SKNode? {
    if let path = NSBundle.mainBundle().pathForResource(file, ofType: "sks") {
      var sceneData = NSData(contentsOfFile: path, options: .DataReadingMappedIfSafe, error: nil)!
      var archiver = NSKeyedUnarchiver(forReadingWithData: sceneData)
      archiver.setClass(self.classForKeyedUnarchiver(), forClassName: "SKScene")
      let scene = archiver.decodeObjectForKey(NSKeyedArchiveRootObjectKey) as GameScene
      archiver.finishDecoding()
      return scene
    } else {
      return nil
    }
  }
}
Replace the ViewDidLoad method with this code to create a scene in fullscreen mode for iPad and iPhone:
override func viewDidLoad() {
  super.viewDidLoad()

  // Detect the screensize
  var sizeRect = UIScreen.mainScreen().applicationFrame
  var width = sizeRect.size.width * UIScreen.mainScreen().scale
  var height = sizeRect.size.height * UIScreen.mainScreen().scale

  // Scene should be shown in fullscreen mode
  let scene = GameScene(size: CGSizeMake(width, height))

  // Configure the view.
  let skView = self.view as! SKView
  skView.showsFPS = true
  skView.showsNodeCount = true

  /* Sprite Kit applies additional optimizations to improve rendering performance */
  skView.ignoresSiblingOrder = true

  /* Set the scale mode to scale to fit the window */
  scene.scaleMode = .AspectFill
  skView.presentScene(scene)
}
Limit the supported screen orientations to LandscapeLeft:
override func supportedInterfaceOrientations() -> Int {
  return Int(UIInterfaceOrientationMask.LandscapeLeft.rawValue)
}
3. Add the space ship:
I’ll add a spaceship sprite. The sprite will automatically orient and move to a touch location on the screen:
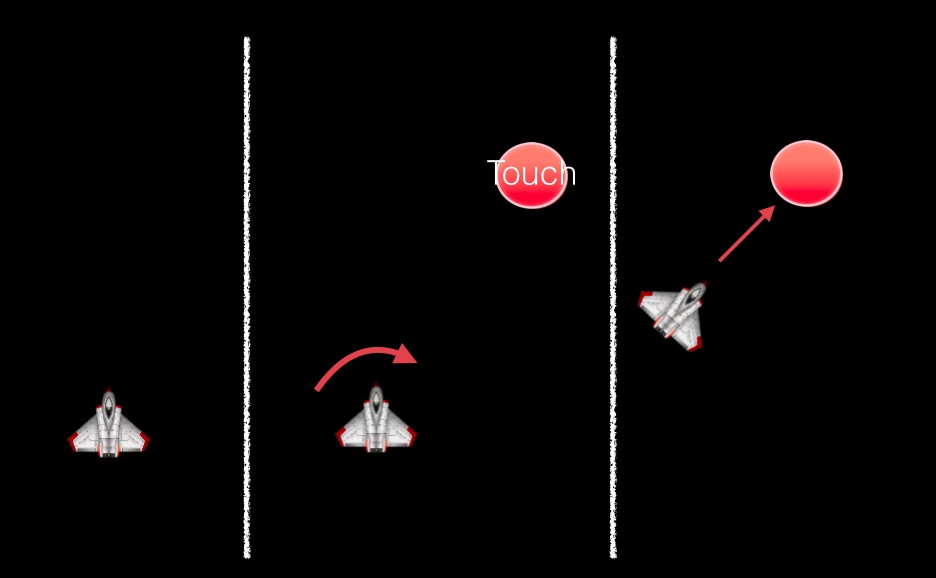
The automated orienting of the spaceship is implemented with a little trick. I’ll add a SKConstraint to an invisible sprite. I case of a touch event, the invisible sprite is moved to the touch location and the spaceship is automatically oriented to this invisible sprite/touch location.
3.1. Open the GameScene.swift file and remove the code for creating a label in didMoveToView:
override func didMoveToView(view: SKView) {
  /* Setup your scene here */
}
3.2. Create two global Sprite properties:
var heroSprite = SKSpriteNode(imageNamed:"Spaceship")  var invisibleControllerSprite = SKSpriteNode()
override func didMoveToView(view: SKView) {
  /* Setup your scene here */
}
3.3. Create a sprite inside didMoveToView:
self.backgroundColor = UIColor.blackColor()
  // Create the hero sprite and place it in the middle of the screen
  heroSprite.xScale = 0.15
  heroSprite.yScale = 0.15
  heroSprite.position = CGPointMake(self.frame.width/2, self.frame.height/2) self.addChild(heroSprite)
3.4. Create an invisible sprite to implement the orientation behavior inside didMoveToView:
// Define invisible sprite for rotating and steering behavior without trigonometry
invisibleControllerSprite.size = CGSizeMake(0, 0)
self.addChild(invisibleControllerSprite)

// Define a constraint for the orientation behavior  let rangeForOrientation = SKRange(constantValue: CGFloat(M_2_PI*7))
heroSprite.constraints = [SKConstraint.orientToNode(invisibleControllerSprite, offset: rangeForOrientation)]
3.5. Replace the code inside the touchesBegan method to implement the sprite movement:
override func touchesBegan(touches: Set<NSObject>, withEvent event: UIEvent) {
  /* Called when a touch begins */
  for touch in (touches as! Set<UITouch>) {
    // Determine the new position for the invisible sprite:
    // The calculation is needed to ensure the positions of both sprites
    // are nearly the same, but different. Otherwise the hero sprite rotates
    // back to it's original orientation after reaching the location of
    // the invisible sprite
    var xOffset:CGFloat = 1.0  var yOffset:CGFloat = 1.0  var location = touch.locationInNode(self)  if location.x>heroSprite.position.x { xOffset = -1.0 }  if location.y>heroSprite.position.y { yOffset = -1.0 }

    // Create an action to move the invisibleControllerSprite.
    // This will cause automatic orientation changes for the hero sprite
    let actionMoveInvisibleNode = SKAction.moveTo(CGPointMake(location.x - xOffset, location.y - yOffset), duration: 0.2)  invisibleControllerSprite.runAction(actionMoveInvisibleNode)

    // Create an action to move the hero sprite to the touch location
    let actionMove = SKAction.moveTo(location, duration: 1)  heroSprite.runAction(actionMove)
  }
}
That’s all for today. In my next part I’ll add some enemies and bullets. You can download the code from GitHub: Part 1 or the latest version here.
You can also download my prototyping App for this tutorial series:
Lite Version
Full Version
Cheers,
Stefan